 |
|
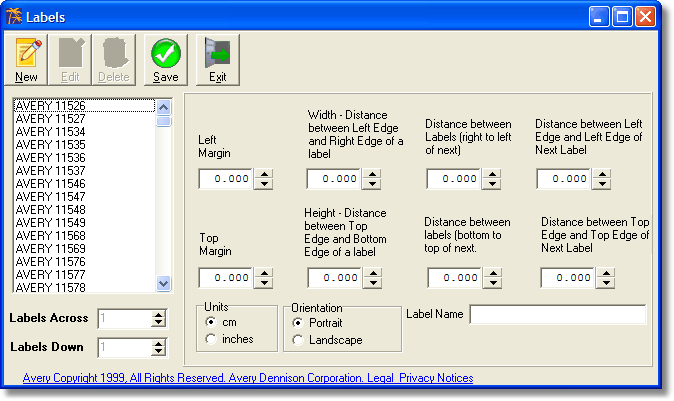
The Label Size Setup provides a method of setting up different types of label stock. There are a number of Avery Label stock sizes included with the installation of System Five. You can add, modify and remove label sizes from this window to meet your business needs. The Label Size Setup window is shown in Figure 1.
The Label Size function, shown in Figure 1, can be accessed using the following Navigator menu path:
Setup Tools > Printing Options > Form and Label Designers > Label Designers > Label Size

Figure 1: The Label Size Setup window
Save: This saves the selected label.
Delete: This Deletes the currently selected label.
New: This creates a new label type.
Close: This exits the window.
Screen options:
On the left side of the screen you are able to define the number of labels running across the page with the Labels Across setting. Below this you can specify how many Labels Down the sheet should have. You will also notice that there are more settings to the right such as Left Margin, Top Margin etc. This is how you specify how many labels you want per page, and their size.
At the bottom right, you can specify if you would like the labels measured in Centimeters (cm) or in Inches. You can also specify the Orientation, Portrait (taller than wide) or Landscape (wider than tall). On the bottom right you can give your new labels a name, when you do, that label setting appears on the large window on the left. Remember to save your new labels.
Finally, to make things really easy, on the left hand side you will notice the largest window shows a list of Avery Product Codes. Merely click on one of these and the settings for that particular label will be entered in for you in all the selections. You would need of course the appropriate Avery labels to print on, or at least a compatible set of labels to use the Avery Product Codes.
< Return to: Label Size Setup overview