 |
|
The setup wizard's General Accounting - Financial Year Period Setup command allows you to define book months by one the following methods:
Your settings affect all reporting, point of sale, and accounting functions (journal entries, bills, GL etc).
4-4-5 CALENDAR - in budgeting and accounting, is the breakdown of each month into weeks by counting the number of times Friday occurs within each month.
For example, Jan = 4 weeks, Feb = 4 weeks, Mar= 5 weeks, Apr = 4 weeks, May = 4 weeks, Jun = 5 weeks… etc. to total 52 weeks in a 12 month period. Every third month Friday occurs five times. All other months, Friday occurs four times. Months where Friday occurs 5 times, are considered a 5 week month, whereas the 4 Friday months are considered as 4 week months.
If each financial year always begins on 1 July and ends on 30 June, the periods are as follows:
Period 1 4 weeks - July
Period 2 4 weeks - August
Period 3 5 weeks - September
Period 4 4 weeks - October
Period 5 4 weeks - November
Period 6 5 weeks - December
Period 7 4 weeks - January
Period 8 4 weeks - February
Period 9 5 weeks - March
Period 10 4 weeks - April
Period 11 4 weeks - May
Period 12 5 weeks - June
This means that, Period 1 would be identified by 07/06 throughout the program to represent July as the Book month and 2006 as the period year.
To set and configure the book month method, select Setup Tools> Setup Wizard> General Accounting> Financial Year Period Setup as shown in Figure 1.

Figure 1: The Financial Year Period Setup menu
The Financial Year Period Setup window shown in Figure 3 appears.
Click the links below to read about the configuration required for the book month method you select:
Select the Manual Advance option. The Financial Year Period Setup window shown in Figure 2 appears.

Figure 2: The Financial Year Period Setup window - Manual Advance method
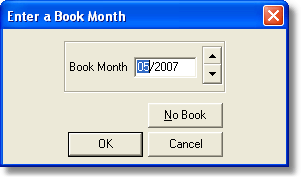
Advance the A/R Book Month, A/P Book Month, Ledger Book Month by typing directly in the text box or by clicking on the field name to open the Enter a Book Month dialog box shown in Figure 3, to select a date or no book option before clicking [OK]. Click [Save] to save your selection.

Figure 2: The Financial Year Period Setup window - Calendar Book Months
Select the Calendar Book Months option. The Financial Year Period Setup window shown in Figure 4 appears (default method). The calendar displays up to four months of the current year with current day marked. Use the forward and back arrow to display future or previous months. Click [Save] to save your selection.

Figure 4: The Financial Year Period Setup window - Calendar Book Months method
Select the 4-4-5 option. The Financial Year Period Setup window shown in Figure 5, displays up to four months of the current year with current day marked. Use the forward and back arrow to display future or previous months.

Figure 5: The Financial Year Period Setup window - 4-4-5 method
Select the 5-4-4 option. The Financial Year Period Setup window shown in Figure 5 appears. he calendar displays up to four months of the current year with current day marked. Use the forward and back arrow to display future or previous months.

Figure 5: The Financial Year Period Setup window - 5-4-4 method
Select the 5-4-4 option. The Financial Year Period Setup window shown in Figure 5 appears. he calendar displays up to four months of the current year with current day marked. Use the forward and back arrow to display future or previous months.

Figure 5: The Financial Year Period Setup window - Custom Months method
< Return to: Topic Overview
< Return to: General Accounting overview