 |
|
System Five's designers share a series of common tools which are listed below:
While the mouse is over the Design area, you can press and hold the Ctrl key on the keyboard, then use the mouse you can select multiple items. To begin the selection, click and hold the left mouse button, then move the mouse in any direction. You see a dotted line in the form of a rectangle. Move the mouse until all of the items you wish to select are inside the dotted line of the rectangle and then release the left mouse button. Release the Ctrl key as well. Then using the Formatting, Scale and Position tools, apply the settings to all selected items at once. See the Align section of Table A for details on the reference item and the effect the different alignment options have on the selected items.
< Return to: Common tools Overview
A set of common formatting tools appears just below the Toolbar in all of the designer windows. The formatting tools are shown in Figure A and detailed in Table A

Figure A: The Common Tools
|
Tool Button |
Purpose and/or Function |
|
|
Bold - click this tool to make the text bold in currently selected items. |
|
|
Underline - click this tool to underline the text in currently selected items. |
|
|
Italics - click this tool to Italicize the text in currently selected items. |
|
|
Alignment - click one of the three for left, center or right aligned text in the currently selected items. |
|
|
Border - click this tool to display the Border Tool shown in TBL-FIGURE 1: |
|
|
The border dialog box provides a quick and easy method of drawing a border around items in your designs. You can adjust the border width for all four sides with the Adjust all borders spin button or you can manually set each border to a different width using the slider controls located on each of the four sides. You see a preview of the borders in the center section of the dialog box. Click OK to apply the borders to the selected items or Cancel to ignore the changes. Both buttons close the Border dialog box. |
|
|
Picture - click this tool to open the Picture dialog box, as shown in TBL-FIGURE 2: |
|
|
|
|
|
Rich Text - click this tool to open the Rich Text editor in Full Screen view. The Rich Text editor allows you to use special fonts and colors to make your designs more polished and professional. |
|
|
Printer Setup - click this tool to make changes to the selected printers setup page in Windows. Changes to the Printer Setup apply to the local machine ONLY. All special printer setup will need to be repeated on each Terminal that will print the form design or you will get unexpected results. |
|
|
Print - click this tool to print a copy of the invoice design. |
|
|
Align - click this tool to display the alignment options dialog box shown in TBL-FIGURE 3: |
|
Note: When selecting multiple items at once, the first item selected is used as a reference point for the Left, Right, Centers, Tops and Bottoms options. The first item selected is indicated in bright yellow, the other items are a darker shade of yellow. |
Each of the options on this dialog box are detailed below: This dialog box provides a method of changing the alignment of all of the selected items in respect to the form. In this case alignment of the boxes, not the text in the boxes. You can affect the Horizontal or Vertical positioning of the boxes on the form as required. |
|
|
|
|
Horizontal |
Vertical |
|
No Change - This option will not change the Horizontal Alignment |
No Change - This option will not change the Vertical Alignment |
|
Left sides - This option will align all selected items to the same left position as the first selected item. |
Tops - This option will align all selected items to the same Top position as the first selected item. |
|
Centers - This option will align all selected items to the same Horizontal Center line as the first selected item. |
Centers - This option will align all selected items to the same Vertical Center line as the first selected item. |
|
Right sides - This option will align all selected items to the same right position as the first selected item. |
Bottoms - This option will align all selected items to the same Bottom position as the first selected item. |
|
Space equally - This option will space all of the selected items equally across the window. The Left most and Right most selected items will not move and all other selected items will be equally spaced between them. |
Space equally - This option will space all of the selected items equally across the window. The Top most and Bottom most selected items will not move and all other selected items will be equally spaced between them. |
|
Center in window - This option will horizontally center all selected items in the window. |
Center in window - This option will vertically center all selected items in the window. |
|
|
Text Color - click this tool to display the Color selection dialog box as shown in TBL-FIGURE 4: |
|
|
This is a Windows dialog box that provides access to the colors available on the local machine. The available colors are dependant on Windows display settings and the power of your graphics card. Selecting colors for Text on forms is only really usefully if you are printing to a color printer. |
|
|
Delete - click this tool to delete the currently selected boxes from your form design. Use this tool with caution, as there is no Undelete function. System Five does require that confirm the deletion of the box or boxes. |
|
|
Font - click the drop down arrow to select a specific Font for the text in the currently selected boxes. The drop down will contain all of the Fonts installed on the local machine. If you choose a Font that is not a Windows standard Font, then that font must also be installed on all machines that will have access to the form design or you will get unexpected results. |
|
|
Font Size - click the spin buttons on the right of this tool to increase or decrease the Font Size of the Text in the currently selected boxes. |
Table A: Common Tools details
< Return to: Common tools Overview
You can change the Scale of the display by using slider or Up and Down arrow buttons, as shown in Figure B.

Figure B: The Scale Tool
Increasing or decreasing the scale allows you to zoom in and out on the form designer.
< Return to: Common tools Overview
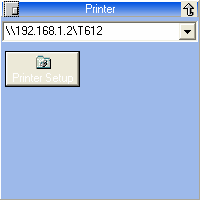
You can change or select the Printer you want the form to print on and modify the Printer Settings using the Printer Tool, as shown in Figure C.

Figure C: The Printer tool
The drop down list along the top contains a list of all the printer drivers that are installed on the local machine. You should be careful not to set the Printer to a device that is not available to all Network users or errors occur when the form is printed from other machines. Printer driver settings are unique on each machine on the Network, even for networked printers. Caution should be used when changing the settings for the Printer when creating form designs.
< Return to: Common tools Overview
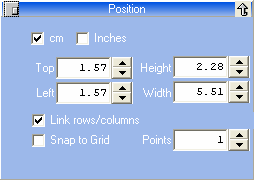
You can change the position of the selected item on the form using the Position tool, as shown in Figure D.

Figure D: The Position tool
Each of these controls can be Docked or Un-Docked from the toolbar to help in the design of the forms.
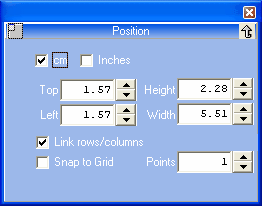
The image in Figure 7 shows the [Position] tool in the Un-Docked mode, the tool can then be moved on the screen as required.

Figure 7: The Un-Docked Position tool
Clicking the small square in the upper left corner of the tool switches the tool from Docked to Un-Docked and back again.
< Return to: Common tools Overview